If you run a blog, a newsletter or a small online shop, and you can picture exactly how you want your site to look but have no idea how to code it, this one's for you. Here's the short answer: you design the look in Canva, where you already know your way around, and your AI assistant does the fiddly part of turning that design into your real website. You make every design choice. It does the exporting, placing and checking.
(If you're a virtual assistant doing this for a client, the same split works: the client, or you, designs in Canva, and the AI assistant handles the build. Just make sure the design choices are the client's.)
I'm doing this right now on my music site, Music Is For Girls. This post covers the first stretch, from October 17 to 18, 2026, and it will grow as the redesign goes on.
The look I wanted
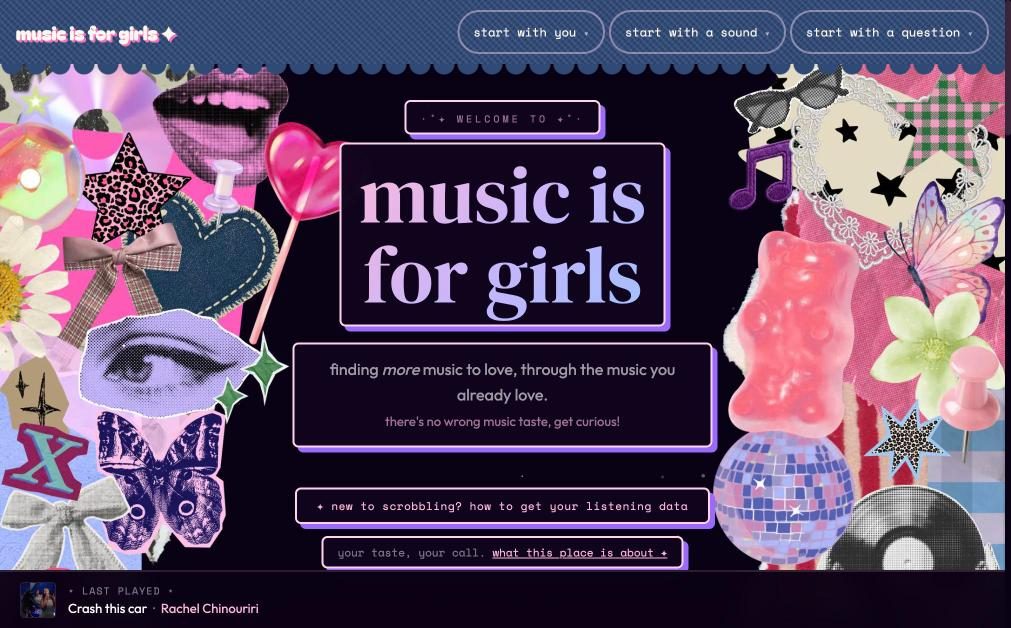
Music Is For Girls already had a dark, starry, MySpace-ish feel (I wrote about how that site started as a one-page toy). For the redesign I wanted more: a Y2K scrapbook look, with paper textures, watercolor and hand-drawn stickers piled up around the edges like the inside of a teenage diary.
That kind of look is all taste: which sticker goes where, what overlaps what, how much is too much. I didn't want an AI tool deciding that. But dragging little pictures around in Canva? That part is the fun part, and I can do it myself.
So the job got split down the middle:
- Me: every design choice, made in Canva.
- My AI assistant: everything between "I like this" and "it's live on the site."
Step 1: The AI assistant got the site ready for stickers
Before any sticker could go on, the site needed a place to put them. My AI assistant did that first, in what we called build 97. (A "build" is one finished, numbered round of changes to the site. My site shows its build number at the very bottom of every page, so I can always tell which version is live.)
Build 97 set up three things:
- Named colors. Instead of the same pink typed out in fifty places, each color got one name the whole site uses. Change it once, it changes everywhere.
- Fonts. The new headline and handwriting fonts from my mood board.
- Sticker spots. Set places on the page where stickers can sit without getting in the way of anything.
Step 2: I designed the sticker layout in Canva, over my real home page
This is the clever bit. Instead of designing on a blank page and hoping it fits, the Canva design used real screenshots of my actual home page, faded out, as a background guide.
So when I opened Canva, I was looking at a pale version of my real site, with the real title, the real buttons and the real text exactly where they sit. Then I placed stickers on top: around the edges, in the corners, in the empty spaces, never over words. I grouped stickers that belong together, so each group would become one piece on the site.
Because the guide was my real page, a butterfly about to land on a button is obvious right away.
Step 3: My AI assistant turned my layout into the real site
Once my layout was done, my AI assistant took over the busywork:
- Exported each sticker group as a PNG with a see-through background. A PNG is a type of picture file. "See-through" (also called transparent) means only the sticker itself shows, with no white box around it, so the site's background shows through the gaps.
- Placed each group on the site in the same spot I put it in Canva.
- Checked it at laptop and phone widths. Same page, different screen sizes, and the main check every time: no sticker sitting over any words.
Then it was my turn again. I reviewed each build and pushed it from GitHub Desktop. (GitHub Desktop is a free app that keeps your site's files in sync with GitHub, and "push" means sending your saved changes up to GitHub so the live site updates.) After each push, my AI assistant checked the build number at the bottom of the live page, so we both knew the new version had really gone live.
That happened three times, all on October 18:
- Build 98: the first version of the home page stickers.
- Build 99: just the sticker strip first.
- Build 100: my whole Canva sticker layout, on every screen size.
My reaction to build 100, word for word: "almost perfect now."
Here's the home page on a laptop, taken October 21, 2026 (the footer said build 101 that day):
And the same page at phone width, the same day:

The rule I set once: real artists get paid
Here's the part that matters most to me. I don't want my site to be "AI made all the pretty things." I want the stickers to come from real people, and I want those people to get paid.
So I'm using templates and elements made by human designers in the Canva Creator program, where creators get paid when their work is used. My rule is simple: stickers come from real creators. AI-made art is fine for a sticker if it looks cute and the money still goes to a real creator. That's where I've landed for now, and it may change as I learn more. My AI guidelines are where I keep my current thinking on how I use AI, and what I won't use it for. If an element pays no real person at all (for example, something Canva generated itself), my AI assistant flags it, and I decide whether to swap it. I do any swaps myself, in my own Canva design.
My AI assistant also keeps what I call a design sources ledger: a spreadsheet with every template, element, font and texture I use, who made it, which site it's on, where it's used, and whether it's been credited yet. In my words, the point is to keep track "so we dont lose our fave shit and our fave artists."
To be clear about where this stands: the creators behind the home page stickers haven't all been looked up yet. That's next (see below). Once each one is checked, they go in the ledger and get a thank-you in the site's footer. Build 97 already made a spot for that thank-you line. It stays hidden until there are real names to put in it.
Why this split works
Every choice on that page is mine: the mood, the stickers, where each one goes, which artists I want to support. What I handed off is the stuff that used to stop me cold: exporting dozens of pieces, lining them up in code, checking every screen size, keeping the paperwork on who made what.
That's the whole idea behind how I use AI. I make the decisions and set the rules once, and the AI assistant does the busywork after that. (If you want to set rules like that for your own AI assistant, here's how I wrote my standing yeses. And if you'd rather start smaller, with pins, here's how I got AI to make Pinterest pins I actually love.)
Want to try it on your own site?
You don't need my exact setup. The pattern is:
- Ask your AI assistant to get your site ready first (one set of named colors and fonts, and set spots for decorations).
- Ask it to put screenshots of your real page into a Canva design as a faded guide, one for laptop and one for phone.
- Design over the guide. Keep decorations off your words, and group pieces that belong together.
- Ask your AI assistant to export each group as a see-through PNG, place it, and check laptop and phone widths for anything covering text.
- Review it, publish it, and check the live page.
- Keep a list of who made every element you use, so you can credit them.
What's next
This post follows the redesign as it happens, so it gets an update after each session. Still ahead:
- A long phone page. A separate Canva design for phone screens, so the stickers can fill the whole background while the cards and text sit on panels on top.
- Looking up every sticker's creator, flagging any element where no real person gets paid, logging them all in the design sources ledger, and drafting the footer thank-you for my approval.
- The rest of the restyle. The home page was first. The other page groups come next, one build at a time, and the last of those builds turns on a light version of the site.
If you want to follow along as the rest of the site gets its stickers, join the newsletter.