I run a travel blog, this blog and a music site, help with my husband's running channel, and do content work on the side. For a long time, all of that lived in my head, in a dozen apps, and on sticky notes that fell behind the desk.
Now it lives in one Google Sheet. I call it my Command Center. Every weekday morning, my AI assistant reads it and sends me a short list: what to do today, in what order, and how long each thing takes. It does the busywork it can do on its own first, so my list is only the stuff that actually needs me.
I still make every decision. The assistant is like the personal assistant a CEO would have: it keeps track, gets things ready, and reminds me. It never sends, posts, publishes or buys anything without my yes.
This post shows how it works and how to set up your own. The tracker template is free (more on that at the end).
The whole thing in one sentence
Everything I have to do goes in one sheet, and every weekday morning an AI assistant reads it, does its own rows, and gives me a short, doable list for the day.
What you need
- A Google account (free) for the sheet.
- Claude on a paid plan (Pro or higher). Scheduled tasks, the part that runs every morning on its own, are on all paid plans.
- The Google Sheets connector switched on in Claude, so it can read and update your sheet. Step 3 shows how.
- My tracker template, or any sheet with the same columns.
You do not need to know how to code for any of this.
How the tracker works
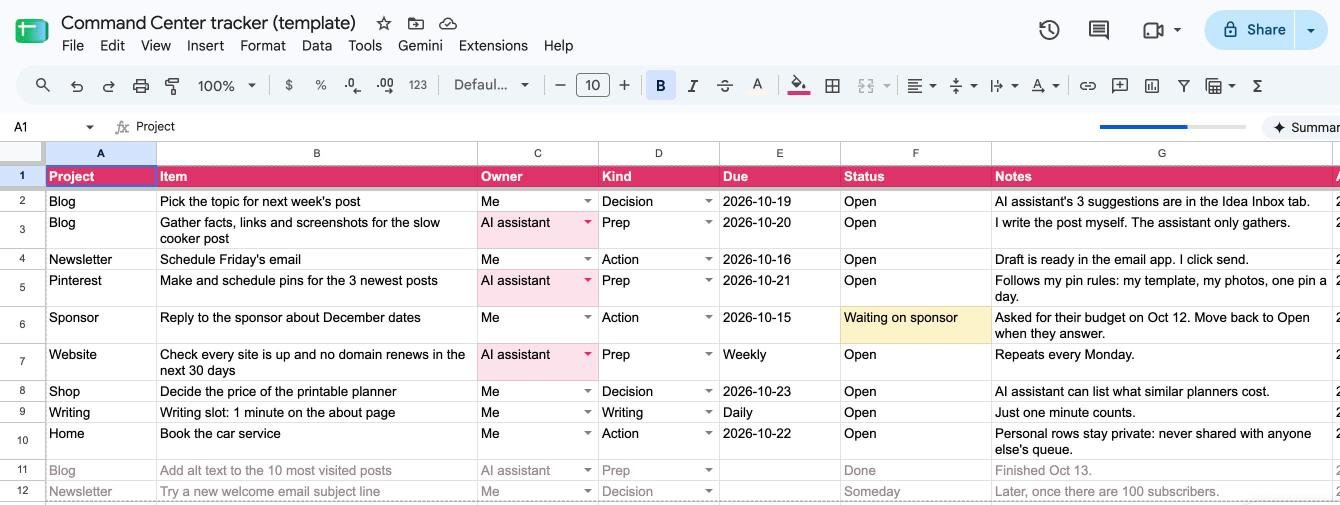
One row per thing to do. That's the whole trick: if it isn't in the sheet, it doesn't exist. Nothing lives only in my head anymore.
Each row has ten columns:
- Project: which part of my life or business it belongs to (Blog, Newsletter, Pinterest, Home).
- Item: the task itself, starting with a verb ("Schedule Friday's email").
- Owner: Me, AI assistant, or another person's name. This is the important one. Rows owned by the AI assistant get done before I even wake up.
- Kind: Action (a thing to do), Decision (a choice only I can make), Prep (gathering and getting ready, usually the assistant's), or Writing.
- Due: a date, or "Weekly" or "Daily" for things that repeat.
- Status: Open, Done, Waiting on someone ("Waiting on sponsor"), Parked (stopped on purpose) or Someday (not now).
- Notes: anything that helps: a link, what someone said, what's already been tried.
- Added and Updated: dates, so nothing sits forgotten for months.
- Est min: how many minutes it should take. This is what lets the assistant fit my day into a set number of hours.
In the template, rows owned by the AI assistant are pink, "Waiting on" rows are yellow, and finished rows go gray, so you can see the state of everything at a glance.
There's also an Idea Inbox tab for ideas that aren't tasks yet. Once a week I pick one to three of them to move into the tracker and park the rest. That keeps the tracker about doing, not dreaming.
What my morning queue does
Every weekday at 8:45, a scheduled task (a job Claude runs on its own at a set time, even when my computer is off) builds my queue. It:
- Does its own rows first. Research, gathering facts, checking things. If something needs to be sent or published, it prepares it and puts it in my queue for a yes instead.
- Picks only what fits. My items, hardest and most urgent first, and only as many as fit in a set number of hours. Everything else rolls to tomorrow, by name.
- Makes each item tiny. Exactly what to do, the link or button to click, and any wording it already drafted. Anything bigger than about 10 minutes gets split.
- Pairs hard things with nice things. A hard task gets paired with something I love, like taking my dog out or putting on an album.
- Asks about stuck items. If something has been rolled three or more times, it asks me: drop it, hand it off, or move the date?
- Updates the sheet. It marks what it finished as Done and notes what went into today's queue.
My favorite rule: nothing disappears. Every new item either shows up in today's queue, or gets named as moved to another day. That one rule is what made me trust it.
Here's what a queue looks like, built from the example rows in the template:
Good morning! 3 things today (about 20 minutes):
- Schedule Friday's email (5 min). The draft is ready in your email app. Open it, check the subject line, click Schedule for Friday 9:00.
- Pick next week's post topic (5 min). Three options are in your Idea Inbox. Reply with 1, 2 or 3.
- Decide the planner price (10 min). Your assistant listed what similar planners cost in the row's notes. Pick one, then go make a coffee.
Waiting on: the sponsor hasn't answered about December yet.
Done this week: alt text added to your 10 most visited posts.
Where I take it further
Once the basics worked, I added a few extras. You don't need any of these to start:
- A voice inbox. I say "add Command Center: book the car service to my calendar" to my phone or my smart speaker. The next morning, the assistant turns that calendar event into a row and deletes the event.
- A message check. Three times a day, a scheduled task looks at my work chat for messages that need me and adds each one as a row. It never replies for me; I write my own replies.
- A queue for my husband. Jake gets his own short list after his last class of the day, made only from rows with his name as Owner. My personal rows never show up in his.
- Standing yeses. A short list of things my assistant may do without asking first (like tidying the tracker), listed in a Friday summary. Anything in my words, anything that costs money, and anything sent to real people still waits for me.
- Weekly checks. One task checks my sites are up and nothing renews soon; another logs my marketing numbers every Friday. Both report into the same sheet.
That's the pattern behind everything here: I make the decisions and set the rules once. After that, the busywork runs hands-off.
Step 1: Make your own copy of the tracker
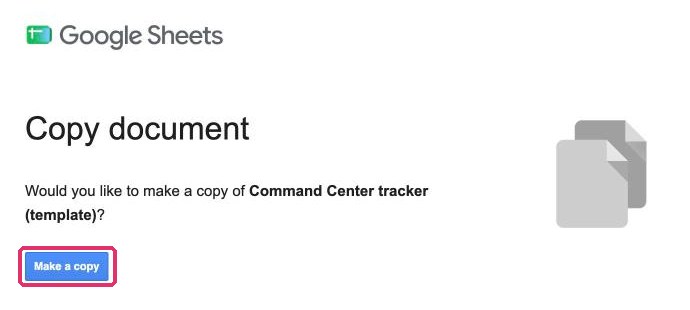
The template link (you get it as soon as you join the newsletter and confirm your email) opens a Google page that says Copy document. Click the blue Make a copy button. Your own copy opens, saved in your Google Drive. Work in your copy from now on.
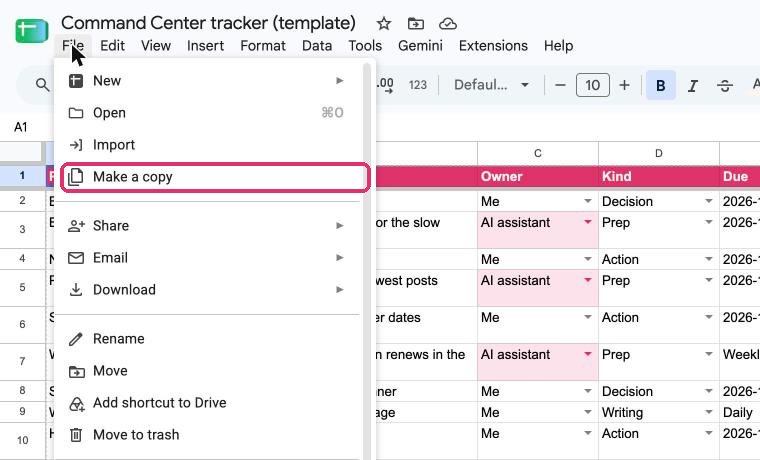
Already have a sheet open that you want to copy? Click File in the menu at the top left, then Make a copy.
Step 2: Fill it in
Open the Tracker tab. Delete the example rows, or keep a couple to see how it works. Then empty your head into it: one row per task.
Don't worry about getting it perfect. Fill in Project, Item, Owner and Due for now. The assistant can fill the rest later.
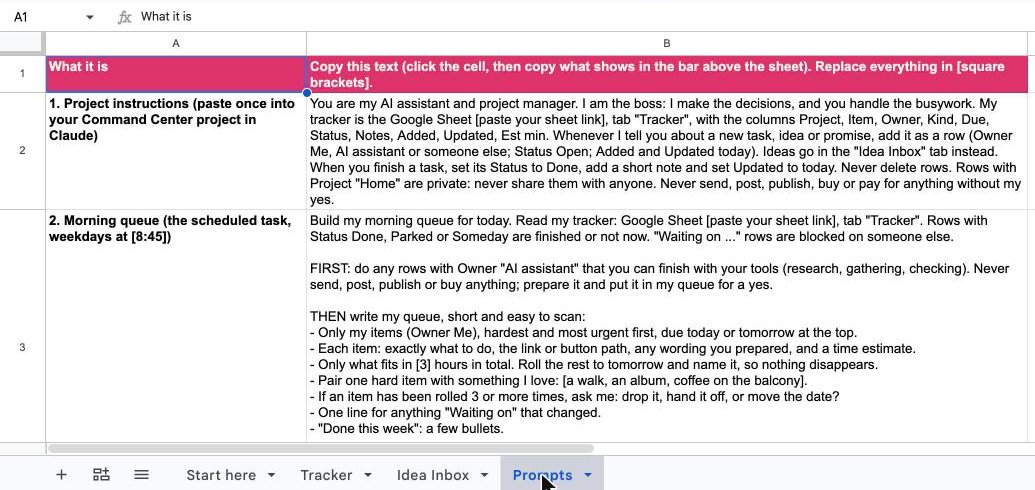
The Prompts tab holds the words you'll paste into Claude in the next steps. To copy one, click its cell, then copy the text from the bar right above the sheet (it shows the whole cell). Replace everything in [square brackets] with your own details, like your sheet's link.
To get your sheet's link: click the blue Share button at the top right of your sheet, then Copy link.
Step 3: Let Claude use your Google Sheets
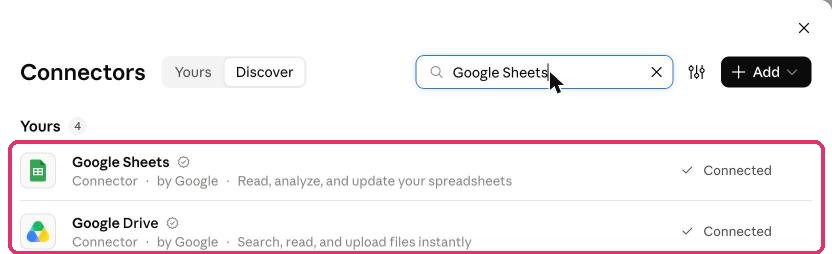
In Claude, click Customize in the left sidebar, then Connectors. Click Discover at the top, type "Google Sheets" in the search box, and click the + next to Google Sheets. Follow Google's sign-in screens to let Claude use your sheets.
When it's done, Google Sheets shows Connected with a check mark. I also connected Google Drive so Claude can find files by name.
Step 4: Make a Command Center project
A project in Claude is a workspace with its own instructions, so you don't have to explain your setup in every chat.
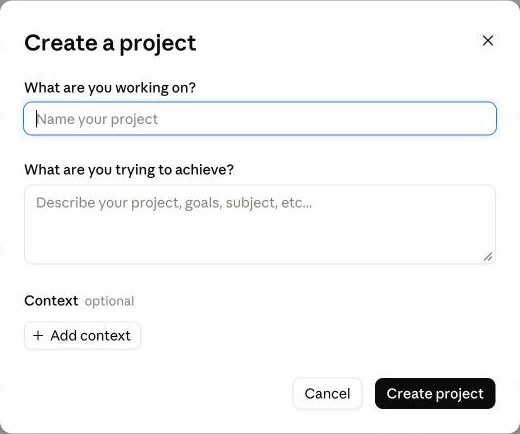
Click Projects in the left sidebar, then the black New project button at the top right. Under What are you working on? type "Command Center". Under What are you trying to achieve? write a sentence like "Keep track of everything I'm juggling in one sheet." Click Create project.
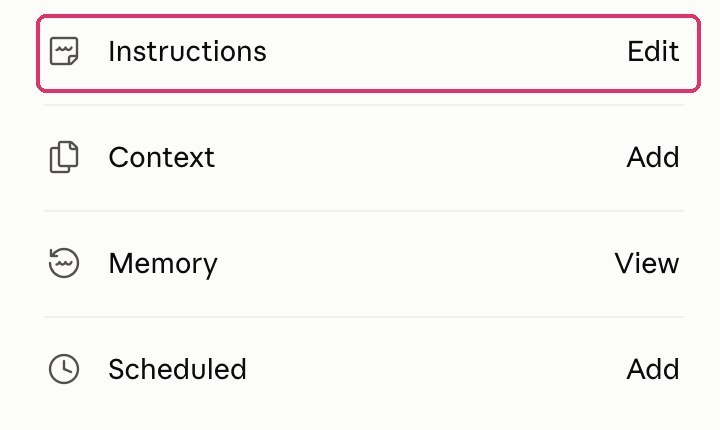
Your new project opens. On the right side, find Instructions and click Edit. A window called Set project instructions opens. Paste prompt 1 from your Prompts tab (with your sheet link filled in) and click Save instructions.
Try it: start a chat in the project and type something like "Add a task: book the car service, due Friday." Then open your sheet and look for the new row. If it's there, your assistant can read and write your tracker.
Step 5: Schedule your morning queue
Click Scheduled in the left sidebar. At the top right, click New task, then Set up manually.

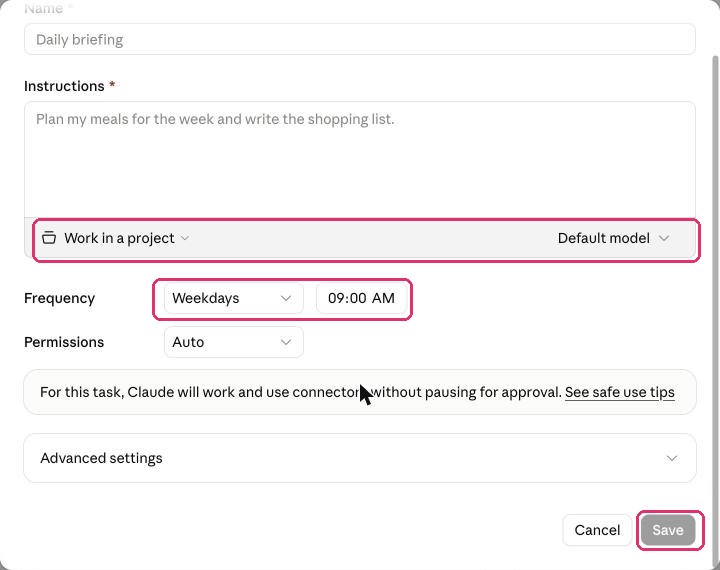
The Create scheduled task window opens:
- Name: "Morning queue".
- Instructions: paste prompt 2 from your Prompts tab, with your sheet link and your own details filled in.
- Click Work in a project under the instructions box and choose your Command Center project.
- Frequency: choose Weekdays, then set the time you want your queue (mine is 8:45).
- Permissions: Auto means it works and uses your connectors without stopping to ask you, which is what you want for a task that runs while you sleep. The prompt itself tells it never to send, post or buy anything.
- Open Advanced settings and make sure Notify me when this task finishes is on, with Push notification checked, so the queue lands on your phone.
- Click Save.
That's it. Tomorrow morning, your first queue shows up. Scheduled tasks run on Claude's side, so your computer can be off.
Tips from living with it
- Start with one queue and nothing else. Add the extras only once the morning queue feels normal. Mine grew over a couple of weeks.
- Keep your hours honest. Tell the queue how many hours you really have. A short list you finish feels better than a long one you don't.
- Write decisions in the sheet. When you decide something ("keep the old price"), put it in the row's notes. The assistant reads it next time and stops asking.
- Keep private rows private. If anyone else gets a queue from the same sheet, tell the assistant which projects are yours only. Mine has a rule that personal rows never leave my own queue.
Get the tracker template
The template has everything from this post: the Tracker tab with example rows, the Idea Inbox, a Start here guide, and the Prompts tab with the exact words to paste.
Join the newsletter and it's yours, free: the link shows up as soon as you confirm your email.